
REST Level 0.5
I’ve read several articles about REST, even a bit of the original paper. But I still have quite a vague idea about what it is. I’m beginning to think that nobody knows, that it’s simply a very poorly defined concept. Like Web 2.0, everyone talked about it but nobody could give a clear definition. Thoughts?
— RivieraKid
This article will briefly lay out the Richardson Maturity Model of REST, which describes where an API sits in terms of RESTfulness. We’ll then propose a well-defined and simplified version of REST, called REST Level 0.5, which can be summarized on the back of a napkin. For brevity, we will not go into a deep discussion of REST or its history. For those interested in the history of REST and what it is, this is a great resource.
A summarized version of the Richardson Maturity Model includes:
Level 0
- Uses HTTP, but only as a transport mechanism.
- All requests
POSTto one URL. - Plain old XML or JSON.
Level 1
- Nouns (resources) instead of verbs (procedures).
- Each resource gets its own URL, which includes the ID of the resource in the path.
- The verb still goes in the request body or headers.
Level 2
- Use HTTP verbs.
- Use HTTP status codes.
- Use GET to read resource(s).
- Use POST to modify resource(s).
- Better yet, use POST to create, PUT or PATCH to edit, and DELETE to, you know, delete.
Level 3
HATEOAS (Hypermedia As The Engine of Application State). Most APIs rarely venture this far. Essentially, requests can now return references to other resources as hyperlinks. This is outside the scope of our article, and unuseful for many APIs.
The Problem
Many APIs will fall somewhere between level 0 and level 2, perhaps using a mixture of different levels for different parts.
The issue is level 2 is an awkward fit for many domains. There is a DELETE, but not an UNDELETE. Batching was explicitly not supported in the original REST paper, so various APIs roll their own implementations. GET does not make sense for many authenticated APIs, where built-in caching is unwanted. Interactions between many different types of resources are not well defined. Many have their own interpretations and definitions of what REST even entails.
Thus, we propose REST Level 0.5, which takes the parts we found useful and provides a single, well-defined set of rules that is quickly learned. There are no silver bullets, but REST Level 0.5 has been found to work well on multiple APIs we’ve built. As always, there may be a better fit for your domain.
Level 0.5
- One URL per method.
- Only use
POST. - Only use these three status codes:
200,400, and500for API method implementations. - Use standard HTTP headers and status codes for cross-cutting concerns like authentication, authorization, rate limiting, etc.
- We like to use a standard
JSONpayload request with aJSONpayload response.
A sample URL might look like this:
POST https://libraryresourcesapi.faithlife.com/v1/getTextRangesForWordNumbers
That’s it! Everything you need and nothing more.
For a detailed analysis, which includes many of the drawbacks of REST Level 0.5, we recorded a talk.
Posted by Erik Lanning on September 15, 2023
Troubleshooting Azure DNS Timeouts
We recently completed a large “Lift and Shift” of our on-premises application hosting into the Microsoft Azure cloud. In this post, I will describe one of the problems we encountered, troubleshot, and resolved on the new Windows Virtual Machines that were now hosting our C# applications.
The Problem
Our applications would generate network-related errors at random when running in the new environment. We could go days without seeing an error from any particular application, but there were always some errors – no rhyme nor reason across the network as a whole.
Examples
When connecting to our MySql instances, we might have seen:
MySqlConnector.MySqlException (0x80004005): Unable to connect to any of the specified MySQL hosts.
  at MySqlConnector.Core.ServerSession.OpenTcpSocketAsync
  at MySqlConnector.Core.ServerSession.ConnectAsync
When making HTTP requests we might have seen:
System.Net.WebException: The remote name could not be resolved: 'example.com'
  at System.Net.HttpWebRequest.EndGetResponse
or
System.Net.Http.HttpRequestException: No such host is known. (example.com:443)
 ---> System.Net.Sockets.SocketException (11001): No such host is known.
   at System.Net.Sockets.Socket.AwaitableSocketAsyncEventArgs.ThrowException(SocketError error, CancellationToken cancellationToken)
   at System.Net.Sockets.Socket.AwaitableSocketAsyncEventArgs.System.Threading.Tasks.Sources.IValueTaskSource.GetResult(Int16 token)
   at System.Net.Sockets.Socket.<ConnectAsync>g__WaitForConnectWithCancellation|277_0(AwaitableSocketAsyncEventArgs saea, ValueTask connectTask, CancellationToken cancellationToken)
   at System.Net.Http.HttpConnectionPool.ConnectToTcpHostAsync
These errors would occur for host names that absolutely existed and were readily accessible otherwise. The specific host did not matter–these errors occurred for hosts we controlled as well as those controlled by third parties.
The main trouble was that the problem was just so rare, yet persistent; specific, yet pernicious. How could we reproduce it? Was our application code doing something wrong, or was it the C# framework, or could any request from those VMs reproduce it? Was it DNS, or was it the request after DNS resolved? If it was DNS, was it specific to the way we set up our DNS hosts or virtual network? If it was the request, was it the source-server, was it the network, or was it the destination server? Was it load-related, on the source VM or on some network bottleneck or in Azure DNS itself?
Troubleshooting
We were eventually able to reproduce the errors outside of running apps using Powershell scripts running on our Azure VMs (it never reproduced outside of Azure). In the first versions of the script, it needed to run for a few days before we could know whether we had managed to reproduce the problem.
By testing many variants of the script, we were able to narrow the problem down to DNS resolution itself. I was then able to get the “Mean-Time-to-Reproduce” down to “randomly between two to six hours” by having the script clear the DNS cache between each attempt.
This is the simplest version of the Powershell we used to reproduce the problem:
Write-Host "Start: $(Get-Date -Format "o")"
$stopwatch = [system.diagnostics.stopwatch]::StartNew()
do {
    Start-Sleep -Seconds 1
    Clear-DnsClientCache
    $time = (Measure-Command {
        try {
            $result = [System.Net.Dns]::GetHostAddresses("azure.microsoft.com")
        } catch {
            Write-Host $_
            $result = $False
        }
    }).TotalSeconds
} while ($result);

Write-Host "$time-second timeout after running for $($stopwatch.Elapsed.TotalMinutes) minutes at $(Get-Date -Format "o")"
When it finally encountered the error, the DNS resolution would time out after about 11 seconds. The script output looked something like this:
Start: 2023-01-04T18:39:37.8532468+00:00
Exception calling \"GetHostAddresses\" with \"1\" argument(s): \"No such host is known\"
12.1075537-second timeout after running for 65.1770462016667 minutes at 2023-01-04T19:44:48.8129523+00:00
We now knew the problem wasn’t specific to our application code.
From there, we discovered that when using an entirely fresh Azure Windows VM in in an entirely fresh VNet using Azure’s default DNS provider, we could run this script and reproduce the problem. This meant it wasn’t (necessarily) a problem with our “Lift and Shift” network or our own Faithlife DNS configuration. Further, we could create two reproduction environments, one using Azure’s built-in DNS and one using Google’s 8.8.8.8 DNS. The Google environment did not reproduce the problem.
This narrowed the problem down decisively: it occurred on a default-configuration Microsoft Windows VM on a default-configuration Microsoft Azure Virtual Network trying to use default-configuration Microsoft Azure DNS to resolve azure.microsoft.com.
At this point, we escalated our Azure support ticket. The new rep spotted something interesting when we reproduced the problem and got them a packet capture! They noticed that the DNS request which failed happened to use UDP Source Port 65330 when talking to Azure DNS – and if you dig deep into the VNet documentation, you will discover that UDP Port 65330 is reserved for Azure’s own use.
The final script to reproduce the problem looks like this:
> dns-timeouts.sh
#!/usr/bin/env bash

# Azure subscription ID to use
subscription="$1"

# Azure location (e.g. "westus3")
location="$2"

# When not provided, sets up a new reproduction environment.
# When provided, fetches results of previous run.
suffix="$3"

set -e +H

if test -z "${subscription}" -o -z "${location}"; then
  echo "Usage: \`${0} subscription location [suffix]\`"
  exit 1
fi

if test -z "${suffix}"; then
    suffix=$RANDOM
    create=1
else
    create=0
fi

resource_group="dns-rg-$suffix"
azure_vnet="dns-vnet-azure-$suffix"
google_vnet="dns-vnet-google-$suffix"
azure_vm="dns-vm-azure-$suffix"
google_vm="dns-vm-google-$suffix"
storage_account="dnssa$suffix"
packet_capture="dns-capture-$suffix-$RANDOM"

if test $create -eq 1; then

    echo "Creating networks..."

    az group create --subscription "$subscription" --location "$location" \
    --name "$resource_group"

    azure_subnet_id=$(az network vnet create --subscription "$subscription" --location "$location" --resource-group "$resource_group" \
    --name "$azure_vnet" --subnet-name test \
    -otsv --query "newVNet.subnets[0].id" | tr -d '\r')

    google_subnet_id=$(az network vnet create --subscription "$subscription" --location "$location" --resource-group "$resource_group" \
    --name "$google_vnet" --subnet-name test --dns-servers "8.8.8.8" \
    -otsv --query "newVNet.subnets[0].id" | tr -d '\r')

    echo "Creating VMs..."

    # If you get an error about `--subnet_id` being invalid, try setting `export MSYS_NO_PATHCONV=1` to disable path expansion
    az vm create --subscription "$subscription" --resource-group "$resource_group" --location "$location" \
        --name "$azure_vm" --computer-name "dns-a-$suffix" --subnet "$azure_subnet_id" \
        --image Win2022AzureEditionCore --size Standard_B1s \
        --admin-username azureuser --admin-password "12345abcde!ABCDE" --public-ip-address "" --nsg "" --public-ip-sku Basic \
        --nic-delete-option delete --os-disk-delete-option delete --data-disk-delete-option delete

    az vm create --subscription "$subscription" --resource-group "$resource_group" --location "$location" \
        --name "$google_vm" --computer-name "dns-g-$suffix" --subnet "$google_subnet_id" \
        --image Win2022AzureEditionCore --size Standard_B1s \
        --admin-username azureuser --admin-password "12345abcde!ABCDE" --public-ip-address "" --nsg "" --public-ip-sku Basic \
        --nic-delete-option delete --os-disk-delete-option delete --data-disk-delete-option delete

    echo "Installing Network Watcher..."

    az vm extension set --subscription "$subscription" --resource-group "$resource_group" --vm-name "$azure_vm" --publisher Microsoft.Azure.NetworkWatcher --name NetworkWatcherAgentWindows --version 1.4

    echo "Creating Storage Account..."

    az storage account create --subscription "$subscription" --resource-group "$resource_group" --location "$location" \
        --name "$storage_account" \
        --sku Standard_RAGRS \
        --kind StorageV2

    echo "Starting packet capture..."

    az network watcher packet-capture create --subscription "$subscription" --resource-group "$resource_group" --vm "$azure_vm" --name "$packet_capture" --storage-account "$storage_account" \
      --filters "[{\"protocol\":\"UDP\", \"remoteIpAddress\":\"168.63.129.16\"}]"

    echo "Running test..."

    # The RunPowerShellScript command will "time out" after about an hour, but the script will keep running on the VM until it exits.
    test_command='
Write-Host "Start: $(Get-Date -Format "o")"
$stopwatch = [system.diagnostics.stopwatch]::StartNew()
do {
    Start-Sleep -Seconds 1
    Clear-DnsClientCache
    $time = (Measure-Command {
        try {
            $result = [System.Net.Dns]::GetHostAddresses("azure.microsoft.com")
        } catch {
            Write-Host $_
            $result = $False
        }
    }).TotalSeconds
} while ($result);

Write-Host "$time-second timeout after running for $($stopwatch.Elapsed.TotalMinutes) minutes at $(Get-Date -Format "o")"
'

    az vm run-command invoke --subscription "$subscription" --resource-group "$resource_group" \
        --name "$azure_vm" \
        --command-id RunPowerShellScript --no-wait --scripts "$test_command"

    az vm run-command invoke --subscription "$subscription" --resource-group "$resource_group" \
        --name "$google_vm" \
        --command-id RunPowerShellScript --no-wait --scripts "$test_command"

    # Wait for completion. To fetch results, run script again.
    echo "Test started. Please run \`${0} $subscription $location $suffix\` to retrieve results after letting script run for at least five hours."

else

    echo "Stopping packet capture..."
    az network watcher packet-capture stop --subscription $subscription --name $packet_capture --location $location

    echo "Fetching results..."

    # Enumerates the directory where Azure keeps the output of previous RunPowerShellScript commands
    result_command='
Get-ChildItem -Path C:\Packages\Plugins\Microsoft.CPlat.Core.RunCommandWindows\1.1.15\Status `
  | Get-Content | ConvertFrom-Json `
  | % {
    $a = @{
      Step = $_.status.name;
      Timestamp = $_.timestampUTC
    };

    $_.status.substatus `
     | where { $_.name -eq "StdErr" -or $_.name -eq "StdOut" } `
     | Foreach { $a[$_.name] = $_.formattedMessage.message };

    [pscustomobject] $a;
  } `
  | Sort-Object -Descending -Property Timestamp | Select-Object -Skip 0 -First 3 | Format-List'

    echo ""
    echo "Azure DNS:"
    printf '%b\n' "$(az vm run-command invoke --subscription "$subscription" --resource-group "$resource_group" \
        --name "$azure_vm" \
        --command-id RunPowerShellScript --scripts "$result_command" --query "value[].message | join('', @)")"

    echo ""
    echo "Google DNS:"
    printf '%b\n' "$(az vm run-command invoke --subscription "$subscription" --resource-group "$resource_group" \
        --name "$google_vm" \
        --command-id RunPowerShellScript --scripts "$result_command" --query "value[].message | join('', @)")"

    echo ""
    echo "To clean up, \`az group delete --yes --no-wait --subscription $subscription --resource-group $resource_group\`."
fi
Resolution
So this was the situation:
- When you make a DNS request, Windows will choose a “Dynamic Port” to use for your traffic.
- The Microsoft-provided default range for Azure Windows images is ports 49152 through 65535, which has 16383 ports to choose from, including port 65330.
- When a DNS request times out and retries, it will re-use the same dynamic “Source Port” until it gives up entirely (after 11 seconds).
- So, one out of 16,383 DNS requests would randomly fail because Azure blocked the request entirely when using port 65330. At one request per second, that’s about four hours “Mean-Time-to-Reproduce” (which matches what we were seeing).
- Meanwhile, Google DNS was working because it was using TCP, not UDP, for requests routing outside of the VNET.
Which finally brings us to the fix: Tell Windows not to use the port that Microsoft doesn’t want us using in Azure. You do so by giving it a “range” of 65330 - 1 - 49152 = 16177 ports to choose from instead of the full 16383.
We rolled this fix out to all of our Windows VMs using Puppet:
exec { 'Disable UDP/65330':
  command  => 'Set-NetUDPSetting -DynamicPortRangeStartPort 49152 -DynamicPortRangeNumberOfPorts 16177',
  unless   => 'exit [int](Get-NetUDPSetting | % { $_.DynamicPortRangeStartPort + $_.DynamicPortRangeNumberOfPorts -gt 65330 })',
  provider => powershell,
}
We’ve suggested that Microsoft consider correcting their base Windows images so that they do not default to using Azure-incompatible ports or, if that is infeasible, improving the Azure documentation on Windows VMs.
Posted by Michael Sterling on February 03, 2023
Color Your Functions!
Faithlife’s Android engineers took a departure from our typical boring approach to adopt Kotlin Coroutines early—before structured concurrency landed in 0.26.0. In other words, when we departed the boring tech train, we hopped on an experimental maglev train’s maiden voyage. We weren’t sure we’d make it, but fortunately we did, and our bet paid off handsomely. Some of our codebases have never seen an AsyncTask implementation, which is a breath of fresh air. kotlinx.coroutines is generally loved by Android engineers.
Function Coloring
The function color metaphor is most often applied to distinguish synchronous vs asynchronous functions and comes from Bob Nystrom’s post “What Color is Your Function?”. In his system, red functions are those that can only be called from other red functions. Blue functions can be called from anywhere. This neatly maps onto many programming languages’ concurrency models. Kotlin’s suspending functions are red. They can only be called from other suspending functions.
Kotlin chose a colored system for coroutines, as opposed to Go’s colorless system. Java’s Project Loom is aiming for a colorless approach also.
When a function is denoted with suspend, the compiler tacks on the capability to pause the execution of the function. Function coloring makes concurrency explicit. Since a suspending function knows how to suspend itself, it also knows how to pause suspending functions it calls.
I’ve written on the mechanics of kotlinx.coroutines in “Kotlin Suspend Bytecode”.
Structured Concurrency
Structured concurrency is a mechanism for limiting the lifetime of running coroutines to objects that have a well-defined lifetime, like UI elements.
In early versions of kotlinx.coroutines, launch (and the other coroutine builders) could be called from anywhere. There were essentially free functions. launch returned a Job, which provided a mechanism to join the coroutine on the current thread or to cancel it. Jobs had to be tracked manually, and forgetting to cancel them appropriately was a pretty easy mistake. The design of the coroutine library didn’t compel consideration of the asynchronous task’s lifetime.
When kotlinx.coroutines shipped structured concurrency, the improved API design compelled reconsidering every coroutine builder call in the codebase. The coroutine builder functions were now extensions on CoroutineScope, so they could only be called with an associated scope. This scope dictated the limits of the associated coroutine’s life. If a coroutine is suspended waiting on the network and its CoroutineScope is associated with the lifetime of UI element that was just dismissed, it’s cancelled.
Swift adopted structured concurrency recently for its concurrency system, so iOS engineers can learn from our mistakes!
Breaking Structured Concurrency
While the kotlinx.coroutine API is designed to encourage best practices, it’s pretty easy to break structured concurrency. One mistake is implementing CoroutineScope on an object without a well-defined lifetime.
This is a real function in one of our codebases, slightly modified to remove irrelevant details:
class ReadingPlanClient : CoroutineScopeBase() {

    @Synchronized
    fun getPlanTemplates(): List<ReadingPlanTemplate> {
        dtoCache.getUnexpiredCachedDto()?.let { resourceIdList ->
            return resourceIdList.readingPlanTemplateList
        }

        dtoCache.getExpiredCachedDto()?.let {
            launch(defaultErrorHandler) {
                fetchAndCache()
            }
            return it.readingPlanTemplateList
        }

        // ...
    }
ReadingPlanClient is a web service client that creates new coroutines in its own scope via the call to launch. That job has no chance of being preempted by cancellation since ReadingPlanClient does not have a well-defined lifetime and thereby is missing a good place to cancel running work. This usurps the design of coroutines.
Imagine a static field kept a reference to an instance of this class. When a fragment fetches reading plan templates and the user immediately navigates away from the screen, all of the fetching and caching work would still execute.
Consider another function that cooperates better with the structured concurrency model:
@ViewModelKey(ConversationViewModel::class)
@ContributesMultibinding(AppScope::class)
class ConversationViewModel @Inject constructor(
// ...
) : ViewModel() {
	// ...

    suspend fun prepareConversation(conversationId: Long, threadId: Long? = null) {
        this.conversationId = conversationId
        this.threadId = threadId

        if (_conversation.value == null) {
            coroutineScope {
                val deferredConversation = async {
                    if (initialConversation != null) {
                        initialConversation
                    } else {
                        messagesRepository.getConversation(conversationId.toString())
                    }
                }
                val deferredDraftMessage = async {
                    messagesRepository.loadDraftMessage(conversationId)
                }
                val deferredRecipients = async {
                    messagesRepository.getConversationRecipientsWithPresence(conversationId)
                }

                _conversation.value = deferredConversation.await()
                deferredDraftMessage.await()?.let(_draftMessage::setValue)
                _recipients.value = deferredRecipients.await()
            }
        }
    }
The important difference here is that the function is suspending. A suspending function can only be called from other suspending functions (a red function in Nystrom’s taxonomy). Since it can only be called from other suspending functions, it pushes the responsibility for a coroutine scope to the caller. Suspending functions don’t have a scope of their own. The call to coroutineScope provides the caller’s CoroutineScope so the suspending function can launch its own child coroutines via async.
In circumstances where prepareConversation is called from a fragment’s view lifecycle scope, the child coroutines will automatically be cancelled when the parent scope is cancelled. This might save a handful of network requests and subsequent caching work.
That is what structured concurrency buys.
Keeping a few simple guidelines in mind goes a long way toward getting the most out of the concurrency model.
API Design & Scope Lifetimes
When building an API with coroutines, take care to avoid hiding suspending functions behind blue functions unless the class can reasonably own the coroutine scope required to house its coroutines. Since the red function calls have become implementation details of blue functions, this interface seems colorless. Ultimately that tactic spreads around details of coroutine execution and makes for a leaky abstraction.
Consider:
- Who’s responsible for cancelling these coroutines?
- When are these coroutines being cancelled?
- What’s the default dispatcher for this scope?
(hint: it should always be the main dispatcher) - Has someone overridden the default error handler?
Many Android classes provide a scope already—usually named lifecycleScope. So unless you have a really specific requirement, prefer what is provided there. When a new CoroutineScope appears in review, ask if there’s an existing scope that already meets the requirements.
Unless it is reasonable for your class to own the coroutine scope, expose suspending functions instead of blue functions that launch coroutines. This provides more flexibility to callers and better indicates the function’s nature.
Suspending Functions
An API that exposes suspending functions is easier to fold into new suspending functions than one that exposes synchronous functions—which may or may not launch coroutines with a dubious lifetime and no control mechanism. Pushing asynchronous work into suspending functions means that once you have bridged the red/blue gap by creating a coroutine your functions are semantically similar to any other function. Calling red functions from a red context is simple. They accept parameters and return values. They execute from top to bottom.
Bridging the red/blue gap might seem tricky, but since suspending functions can only be called from other suspending functions, calling red functions from a blue context requires consideration of the most appropriate coroutine scope in which to create a new coroutine. This is a benefit of the design.
Red function semantics aren’t a bug, they’re a feature. Avoid coroutine scopes that have unbounded lifetimes. When in doubt, paint functions responsible for asynchronous work red. Be mindful of coroutine scopes and of function colors.
If you’re interested in a more complete description of structured concurrency’s design benefits, check out “Notes on structured concurrency, or: Go statement considered harmful”.
Posted by Justin Brooks on June 10, 2022
Using CBL-Mariner 2.0 for ASP.NET Core Apps
Introduction
When CBL-Mariner 2.0 was announced, I wanted to try using its container images to run ASP.NET Core web apps.
As others have already blogged,
we want to be sure to use a Docker multi-stage build with the runtime-deps image in order to reduce the size of the final image.
At first I considered following this example
to build a slimmed-down image based on CBL-Mariner’s distroless/minimal image, but then I discovered Microsoft has a
Dockerfile
to build the runtime-deps image for CBL-Mariner 2.0. It’s not documented, and very likely not supported, but you can pull it from
Docker Hub as mcr.microsoft.com/dotnet/runtime-deps:6.0-cbl-mariner2.0.
I decided to go even further and use the distroless image.
Not only will it be smaller, it should be more secure due to reducing unnecessary files in the image, and running your application as non-root.
Multi-Stage Dockerfile
Here’s a working Dockerfile that builds an ASP.NET Core web app container image based on cbl-mariner2.0-distroless:
# build the application using CBL-Mariner 2.0
FROM mcr.microsoft.com/dotnet/sdk:6.0-cbl-mariner2.0 AS build

# copy in the project file and restore dependencies
WORKDIR /app
COPY *.csproj ./
RUN dotnet restore --runtime linux-x64

# copy in all source files
COPY . ./

# publish a trimmed application
RUN dotnet publish --no-restore -c Release -o out --runtime linux-x64 --self-contained true -p:PublishTrimmed=true -p:PublishSingleFile=true -p:LinkMode=trim

# run the application on a 'distroless' image
FROM mcr.microsoft.com/dotnet/runtime-deps:6.0-cbl-mariner2.0-distroless AS runtime

# copy in the built application
WORKDIR /app
COPY --from=build /app/out ./

# use a non-privileged port; https://github.com/dotnet/dotnet-docker/issues/3796
ENV ASPNETCORE_URLS=http://+:8080

# change the entrypoint name to match your web application
ENTRYPOINT ["./MyWebApp"]
Posted by Bradley Grainger on May 26, 2022
Faithlife’s Software Developer Interview Process
The goal of this blog post is to prepare you to get a software development job at Faithlife! If you have additional questions after reading this article, check out this blog post that outlines FAQs during Faithlife’s Software Development Interview Process.
Our interview process typically takes one to two months from the initial interview to offer. If you have other interviews close to the offer stage, please let us know! Most of the time, we can make the interview process speedier to accommodate you.
1. Phone Screen (1–2 rounds)
The initial phone screen is with a recruiter, engineering manager, or software development group lead and lasts 30–60 minutes. You can anticipate a mix of behavioral and technical questions.
2. Digital Pair Programming #1
This stage consists of a 60–90 minute pair programming session. You’ll be able to choose the language you’re most comfortable with. Before the interview, you’ll receive an email with information that outlines the coding problem you’ll be working on. While we’d like you to have your IDE ready, you shouldn’t write code ahead of time.
For Faithlife de México Interviews:
In addition to the pair programming, you can anticipate a 30–60 minute meeting with some of our Faithlife de México employees.
3. Virtual Onsite (Pair Programming #2 + Development Team Meeting + Development Team Management Meeting)
The virtual on-site consists of a 90-minute pair programming session followed by a 90-minute meeting with some of our Faithlife employees and a 30-minute meeting with Development Team Management.
In the second pair programming, we want to see you write code in an unfamiliar situation. Most of the time, we choose the IDE and language you’ll code in and don’t provide the coding question ahead of time. As in the first pair programming, you’ll want to use Chrome (not Safari) when linking to the video call.
Faithlife’s Software Development interview process is designed to gradually increase in difficulty. Our goal is not to trip you up but to see a holistic view of your soft skills and technical abilities.
4. Offer
Before an offer, we extend a preliminary offer which includes benefits information + offer specifics. After agreeing to the preliminary offer, you’ll receive the official offer. We then run a background check, speak with references, and finalize a start date. Once that’s completed, you’re officially a Faithlife employee! Congratulations!
We value your input! If you have recommendations on how we can improve our interview process, please email devjobs@faithlife.com
Posted by Maria Smithson on May 19, 2021
Recruitment Frequently Asked Questions
What is it like to work at Faithlife?
Each person’s experience is unique. Faithlife’s Glassdoor page provides a holistic view of the company culture. You can also check out the following video:
What is it like to work at Faithlife de México?
En Faithlife de México incorporamos la cultura laboral de Faithlife USA cumpliendo el marco legal de México. Nuestros desarrolladores mexicanos forman parte de diversos equipos estadounidenses trabajando de forma remota desde México. Valoramos la calidad de vida y familiar de cada desarrollador, destacando el trato íntegro hacia nuestros colaboradores.
At Faithlife de México we incorporate the work culture of Faithlife USA in compliance with the Mexican legal framework. Our Mexican developers are part of various U.S. teams working remotely from Mexico. We value the quality of life and family life of each developer, highlighting the integrity of our employees.
Where can I learn more about Faithlife Products?
Check out our Faithlife Products landing page to see a full list of all of our awesome products.
Does Faithlife allow remote work?
Yes! Our goal is for remote work to be as collaborative, enjoyable, and flexible as possible. Here are some of the ways our remote workers stay connected:
- Monthly Software Development Lunch Groups specifically for remote workers!
- Virtual Tech Talks every 2–3 months.
- Weekly Virtual Demo Days that provide the opportunity to see what’s happening in the tech side of the company and showcase the cool things you’re working on.
- Virtual launch celebrations.
- Wellness activities and giveaways.
- Holiday gifts.
How does Faithlife handle time zone differences?
For your first few weeks of onboarding, you will be expected to work the same, or very close to the same, hours as your onboarding buddy. Once you have your footing, we generally recommend everyone try to be online between 10 am and 2 pm Pacific Time. This gives decent overlap for the various time zones.
What does the “ideal” candidate look like for this role?
We don’t have a “one size fits all” approach. For technical roles, we look for people who are excited to grow and learn new technologies. We also look for experience utilizing our tech stack (.NET, JavaScript, React, MySQL). For software development leadership roles, we look for candidates who have experience leading a team or teams while remaining hands-on in the code.
What’s included in the interview process?
Check out this blog post to see Faithlife’s Software Development Interview Process in its entirety.
Is there anything specific I should prepare for prior to the interview?
We recommend the following:
- Read through our Glassdoor reviews to get a sense of what it’s like to work at Faithlife.
- Look through our products listed on Faithlife.com — is there a specific product you’d like to work on? If so, tell the person/people you interview with!
- We recommend answering behavioral interview questions utilizing the STAR interview format. Here’s an article that describes how to use STAR.
- You’re interviewing us just as much as we’re interviewing you! Prior to your interview, we recommend that you write down the questions you’d like to ask us.
- Have fun! We’re excited to get to know you better and have designed our interview process to showcase you at your best. Part of the reason we let developers use their favorite IDE in the coding challenge is because we want you to feel comfortable, confident, and excited to code. Best of luck in your interview! We’re rooting for you.
What language will I use for pair programming?
We have two separate pair programming sessions done at different stages in the interview process.
In the first pair programming, you’re able to choose the language that you’re most comfortable with. Prior to the interview, you’ll receive an email with information that outlines the coding problem you’ll be working on. While we’d like you to have your IDE ready, you shouldn’t write code ahead of time.
In the second pair programming, we want to see you write code in an unfamiliar situation. Most of the time, we choose the IDE and language you’ll code in and don’t provide the coding question ahead of time. As in the first pair programming, you’ll want to use Chrome (not Safari) when linking to the video call.
Faithlife’s Software Development interview process is designed to gradually increase in difficulty. Our goal is not to trip you up but to see a holistic view of your soft skills and technical abilities.
Still have questions? Check out this blog post to see Faithlife’s Software Development Interview Process in its entirety.
What is Faithlife’s Tech Stack?
We primarily develop using C#, JavaScript/TypeScript, React, MySQL, Elasticsearch, Redis, and Azure. If you don’t have experience with one of the listed technologies, still apply! We don’t expect anyone to have experience with each of the technologies in our tech stack.
What does it take to be successful in this role?
We look for people who live out our HOAGIES values. HOAGIES stands for:
Core Values
Honesty — Speak the truth with courage and kindness.
Openness — Share generously, keep asking questions.
Awesomeness — Provoke delighted exclamations: make the customer giggle.
Growth — Onward, upward: growing the church, growing each other.
Initiative — The person you’re waiting for is you.
Elegance — Everything you need and nothing more.
Shipping — Our products can’t help anyone until they have them.
Department Values
In addition to our company values (HOAGIES), Faithlife has Software Development Values.
Stewardship
Responsible for planning, managing, and delivery of tasks and projects.
Ownership — Getting the job done
Effectiveness — Doing the right job
Efficiency — Doing the job right
Membership
Working together, sharing responsibility, and growing co-workers.
Participation — Sharing your perspective
Collaboration — Working together
Leadership — Growing from others
Craftsmanship
Building elegant software that equips the Church.
Direction — Seeing the purpose
Breadth — Growing your skillset
Depth — Mastering skills
What’s the salary range for this role?
Salaries for each role are reviewed annually to ensure Faithlife stays competitive. The exact salary for this role depends on your background/experience and isn’t something that can be assessed this early in the interview process.
Prior to your first phone interview, please determine what your desired salary range is. At the end of the first phone interview, you’ll have the opportunity to tell the interviewer your desired salary range.
Posted by Maria Smithson on May 18, 2021
Using Fiddler to inspect Terraform Azure requests
When using Terraform to configure Azure resources, you may get an unhelpful error message (from terraform apply) similar to the following:
module.<name>.<resource>.<name>: Creating...
╷
│ Error: Error creating/updating Some Thing. Component: Failure sending request:
  StatusCode=409 -- Original Error: autorest/azure: Service returned an error. Status=<nil> <nil>
Setting TF_LOG='DEBUG' will dump the HTTP responses to stderr, but it’s extremely verbose and hard to find the
information you’re looking for. A much easier way to view HTTP responses is by using a HTTP debugger such as Fiddler.
There are a few setup steps you need to perform to enable this:
- Find your Fiddler certificate. Run
certmgr.mscand in Intermediate Certification Authorities > Certificates, findDO_NOT_TRUST_FiddlerRoot. - Right-click > All Tasks > Export, export as Base-64 encoded X.509 (.CER). Save it to a temporary file.
- Open
C:\Program Files (x86)\Microsoft SDKs\Azure\CLI2\Lib\site-packages\certifi\cacert.pemin a text editor running as Administrator. - Paste the contents of the CER file (from step 2) to the end of the file; save it.
Then, to debug Terraform requests:
- Run Fiddler; stop capturing all traffic.
- Set HTTP(S) proxies:
$env:HTTP_PROXY='http://127.0.0.1:8888'; $env:HTTPS_PROXY='http://127.0.0.1:8888' - Run
terraform applyand watch the requests stream into Fiddler. - Now it’s easy to select a single failing request and inspect the response body.
Posted by Bradley Grainger on April 21, 2021
Ignoring ASP.NET Core static file requests in New Relic
We use New Relic for monitoring ASP.NET Core web applications. In one web service, we want to ignore requests for static files; there are a large number of static file requests (that are served quickly), which artificially lowers the average response time and error rate, and they’re unnecessary noise in New Relic.
One way would be to install the New Relic API NuGet package, then explicitly ignore the transaction:
app.UseStaticFiles(new StaticFileOptions
{
    OnPrepareResponse = context =>
    {
        if (context.File.Name == "file-to-ignore.txt")
            NewRelic.Api.Agent.NewRelic.IgnoreTransaction();
    }
});
Another way would be to use custom instrumentation. This is an XML file that specifies method names to match and ignore.
My first approach ignored StaticFileMiddleware.Invoke. Unfortunately, the static file middleware
will be called on every request (if you put UseStaticFiles before UseMvc), so this method will always be invoked and every request
will be ignored.
I tried to refine this by ignoring a method that’s only called when a static file is served:
<match assemblyName="Microsoft.AspNetCore.StaticFiles" className="Microsoft.AspNetCore.StaticFiles.StaticFileContext">
    <exactMethodMatcher methodName="SendAsync" />
    <exactMethodMatcher methodName="SendStatusAsync" />
</match>
However, the static file requests were still being tracked. Inspecting the New Relic log file revealed this line:
[Error] 2020-01-07 21:51:50 Skipping sequential layout method: (Module: C:\Program Files\dotnet\shared\Microsoft.AspNetCore.App\2.2.6\Microsoft.AspNetCore.StaticFiles.dll, AppDomain: clrhost)[Microsoft.AspNetCore.StaticFiles]Microsoft.AspNetCore.StaticFiles.StaticFileContext.SendStatusAsync(System.Int32)
“Sequential layout” made me think of the LayoutKind enum.
When a coworker pointed out that StaticFileContext is a struct,
I made the assumption that New Relic can’t profile methods belonging to a struct, at least when [StructLayout(LayoutKind.Sequential)] is applied, which is the C#
compiler default. (I don’t know why it has this limitation. Searching for the log message above provided no results; maybe it will now at least return this blog post?)
So I next searched for a method (on a class) that is only invoked when StaticFileContext sends a static file, and found LoggerExtensions.
I finally settled on this custom instrumentation to ignore HEAD requests that are handled by StaticFileMiddleware:
<instrumentation>
    <tracerFactory name="NewRelic.Agent.Core.Tracer.Factories.IgnoreTransactionTracerFactory">
        <match assemblyName="Microsoft.AspNetCore.StaticFiles" className="Microsoft.AspNetCore.StaticFiles.LoggerExtensions">
            <exactMethodMatcher methodName="Handled" /> <!-- .NET Core 3.0 -->
            <exactMethodMatcher methodName="LogHandled" /> <!-- .NET Core 2.2.6 -->
        </match>
    </tracerFactory>
</instrumentation>
Use with caution: there is no logging that a request is being ignored due to custom instrumentation, so you can (and I did!) waste a lot of time tracking down missing requests that are due to this. The code-based approach at the top of this post is likely to be better in most situations.
Posted by Bradley Grainger on January 08, 2020
Integrating Dependabot with GitHub Enterprise using Jenkins
Dependabot is a GitHub bot that scans your repositories for outdated dependencies, then opens PRs to update them. Although the code supports GitHub Enterprise, the hosted version of Dependabot only supports GitHub.com. This post will walk you through setting up dependabot-core so that it can scan for outdated dependencies in a GitHub Enterprise repository, using Jenkins to run it.
Firstly, most of the credit should go to the dependabot team who have made the core code freely available, published a Docker image containing it, and written a script that automates the process.
Secondly, this assumes you have a GitHub Enterprise instance available at https://github.example.com, and
Jenkins at https://jenkins.example.com. Change the URLs as appropriate in the following instructions.
1. Set Up Credentials
You will need both GitHub Enterprise and GitHub.com personal access tokens. You can create these at
https://github.example.com/settings/tokens and https://github.com/settings/tokens. Select the
repo scope when creating the tokens. PRs opened by Dependabot will be created by the GitHub user who creates the tokens.
These credentials need to be stored safely in Jenkins. Go to https://jenkins.example.com/credentials/store/system/domain/_/newCredentials
and create two new Secret text credentials (one per PAT) as follows:
- Scope: Global
- Secret: (paste personal access token here)
- ID:
dependabot-github-enterprise/dependabot-github-com(ID based on PAT) - Description: Dependabot PAT for GitHub Enterprise / Dependabot PAT for GitHub (name based on PAT)
2. Create the Jenkins Job
The Dependabot build can run for one package manager at a time. These instructions configure it for NuGet. The other available options are listed here; adjust the script as necessary.
At Jenkins, create a new Freestyle job named Dependabot-NuGet with the following configuration:
- GitHub project > Project url: https://github.com/dependabot/dependabot-script/
- This project is parameterized
- Add a String Parameter:
- Name: PROJECT_PATH
- Description: GitHub repository name, including org
- Add a String Parameter:
- Restrict where this project can be run: (This job requires a Linux build node that has access to Docker, select as appropriate)
- Source Code Management: Git
- Repository URL: https://github.com/dependabot/dependabot-script.git
- Build Environment
- Use secret text(s) or file(s) - Add the following Bindings
- Secret text
- Variable: GITHUB_ENTERPRISE_ACCESS_TOKEN
- Credentials: Dependabot PAT for GitHub Enterprise
- Secret text
- Variable: GITHUB_ACCESS_TOKEN
- Credentials: Dependabot PAT for GitHub
- Secret text
- Use secret text(s) or file(s) - Add the following Bindings
- Build
- Execute shell
docker pull dependabot/dependabot-core:latest
docker run -v "$(pwd):/home/dependabot/dependabot-script" -w /home/dependabot/dependabot-script dependabot/dependabot-core bundle install -j 3 --path vendor
docker run -v "$(pwd):/home/dependabot/dependabot-script" -w /home/dependabot/dependabot-script -e GITHUB_ENTERPRISE_HOSTNAME=github.example.com -e GITHUB_ENTERPRISE_ACCESS_TOKEN=$GITHUB_ENTERPRISE_ACCESS_TOKEN -e GITHUB_ACCESS_TOKEN=$GITHUB_ACCESS_TOKEN -e PACKAGE_MANAGER=nuget -e PROJECT_PATH=$PROJECT_PATH dependabot/dependabot-core bundle exec ruby ./generic-update-script.rb
Click Save to create the job.
3. Run the Jenkins Job
At https://jenkins.example.com/job/Dependabot-NuGet/, Click Build with Parameters. You will be prompted for PROJECT_PATH;
enter MyOrg/MyRepo. Click Build to start.
The build should run, and list all the out-of-date dependencies it found; it will open a PR on GitHub Enterprise for each outdated dependency.
Posted by Bradley Grainger on December 13, 2019
Being Like Water
I often forget just how young the software craft is. The landscape moves quickly, and many I’ve known have difficulty keeping up with the shifting ground beneath them. A couple of years ago I stumbled onto Huyen Tue Dao’s talk Be Like Water. She highlights the importance of being adaptable and reminds us that skills to build good software aren’t necessarily coupled to the systems we work with any given day. Shortly after joining Faithlife, a colleague shared Dan McKinley’s essay Choose Boring Technology, which tempers the virtue of adaptability in a helpful way. Some of these ideas stick with me today in some form or another and have substantially influenced the direction of the Faithlife Android app’s systems under the hood. In the year since I last wrote about the Faithlife app, several things have changed. Many have stayed the same.
Architecture
Overall, our high level architecture is pretty similar when compared to the previous post. The notable difference is that we have come to adopt more of a Model-View-ViewModel (MVVM) paradigm.
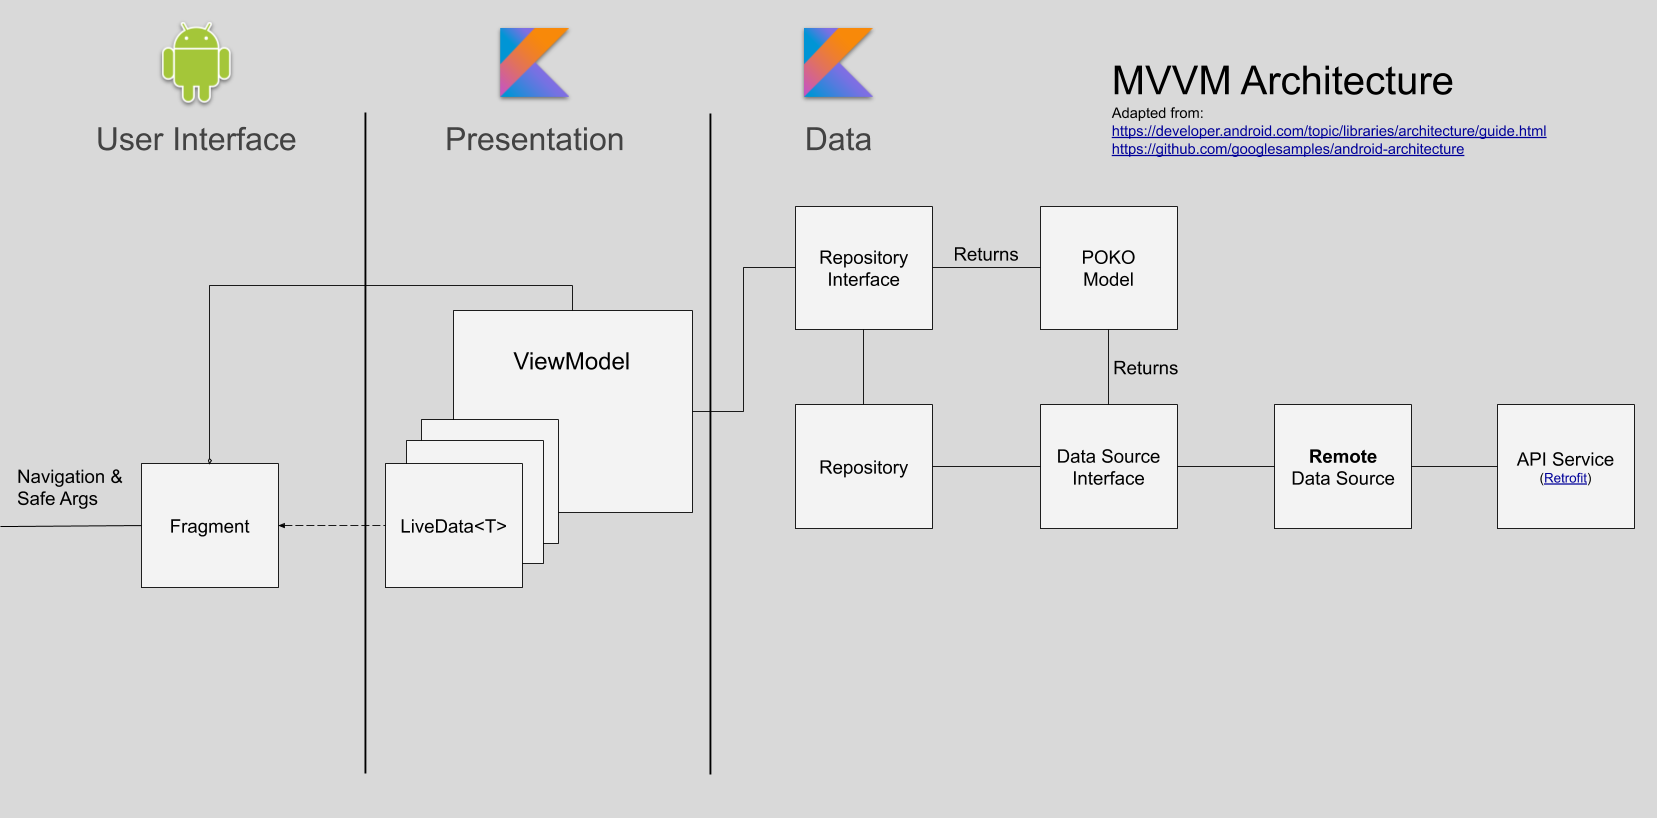
Instead of contract interfaces facilitating precise communication between the view and presentation/business logic in the presenter, the view takes inputs from the user and requests that the viewmodel perform some action. The view is notified of new information by observing properties on the viewmodel.
Android Jetpack
Jetpack continues to be a huge boon to our small team’s productivity. We make use of several components like navigation, viewmodel, and livedata and continue to look to Jetpack components first when we have need of a supplement to the framework itself. Google forms the vessel for Android development, so using their materials will make us more adaptable in the future with less hassle.
ViewModel & LiveData
ViewModel has made handling the lifecycle issues of the old days much less painful. There were solutions before (like headless fragments, shudder) for handling orientation changes well, but none provide the simplicity of ViewModel. Recently, some nice Kotlin coroutine features were added to the class that make structured concurrency easier than ever.
LiveData<T> make observing changes in viewmodel state a breeze by providing observability in a lifecycle-aware way. I wish the API had a more idiomatic affordance for setting values on the main thread with coroutines. Currently, you either have to call postValue or use withContext(Dispatchers.Main) and set value property directly. The latter is more idiomatic, the former is a little safer as it’s impossible to forget to set values on the main thread. We’ve made a habit of the latter since our viewmodel suspend functions are typically called from the main dispatcher context anyway. It’s a small concern for now.
Data Binding
The Jetpack data binding library is something we’re gravitating away from. It has some nice qualities that definitely encourage a separation of view and logic concerns. However, the build time impact is—while not huge by any means—considerable. We decided to try the system some time after making the decision to adopt the MVVM paradigm. Before then, we just modified view properties directly in the LiveData observers we registered in their parent Fragment. The code generator for data binding generates some impressively elaborate Java code, but doesn’t play all that well with Kotlin. One example of this is that to use a top-level extension function in a data binding expression, you had to be aware that the function was compiled into a class that had the name of the file in which the function was defined appended with ‘Kt’. Then you had to know the way extension functions work. The object being extended (the receiver) is passed as the first argument of the function, then all the other arguments are passed.
For example, to use an AliasKind extension defined in MentionExtensions.kt:
<layout>
    <data>
    	<import type="com.faithlife.mobile.MentionExtensionsKt" />
        <variable
            name="aliasKind"
            type="com.faithlife.mobile.AliasKind" />
    </data>

    <androidx.constraintlayout.widget.ConstraintLayout>
    	<TextView
    		android:text="@{MentionExtensionsKt.getDisplayName(aliasKind, context)}"
    		/>
    </androidx.constraintlayout.widget.ConstraintLayout>
</layout>
Slightly modified markup from an internal discussion on the subject
The data binding expression language also had magic variables that you could seemingly reference out of nowhere (like context). None of this is insurmountable, but we’ve agreed that manipulating views in observer listeners is better.
We’re likely going to try out the relatively new view binding system that seems to be a more type-safe way to get references to views from framework components. Adios findViewById.
We’re also keeping an eye on Jetpack Compose. Data binding expressions are a step in the wrong direction considering the new UI toolkit doesn’t use any markup at all.
Dagger 2
We’re also continuing to improve our use of Dagger as a facilitator of dependency injection. We never got into Dagger-Android as it seemed like it was somehow both more magical and constraining than it was worth. Google has shown they agree recently by announcing its deprecation. We’ve worked toward isolating components to subgraphs where possible and have used relatively recent support for setting custom fragment factories on any FragmentManager, in order to make dependency injection more possible in framework components where passing arguments to constructors was historically a bad idea. Our fragments and viewmodels can be passed dependencies via simple @Inject annotated constructors.
All of this makes isolating tests much easier, encourages reuse among different systems, and makes the separation of concerns much clearer among components in the system.
More Than Water
Engineering requires balance. Every choice is a trade-off. Two of our company values, shipping and elegance, characterize this tension well. We were early adopters of Kotlin coroutines and Jetpack Navigation. We didn’t find much value in Koin. We saw promise in databinding so we gave it a shot, but we’re reconsidering so that we might more easily pick up Compose down the road. Choosing how you invest your effort is a tremendously important skill for building good software. We don’t always nail it, but we certainly aspire to. We are adaptable, but we’re more than water; aware of our environment we strive to make choices that will put us in the best position to build a great product.
Posted by Justin Brooks on October 30, 2019
- REST Level 0.5
- Troubleshooting Azure DNS Timeouts
- Color Your Functions!
- Using CBL-Mariner 2.0 for ASP.NET Core Apps
- Faithlife’s Software Developer Interview Process
- Recruitment Frequently Asked Questions
- Using Fiddler to inspect Terraform Azure requests
- Ignoring ASP.NET Core static file requests in New Relic
- Integrating Dependabot with GitHub Enterprise using Jenkins
- Being Like Water
- All Posts